
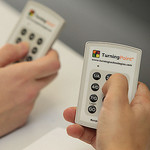
 Many people will be familiar with standard audience voting systems, or “clickers”. These are small handheld devices which can be used to gather responses from an audience, they are the technology-enhanced equivalent of getting the audience to raise their hands. Several Schools and Departments at QMUL have purchased large numbers of these devices and they are being successfully used by staff in a variety of different ways.
The handsets shown in the photo are small, robust and have batteries that last a long time. They are, however, limited to multiple choice type questions. This is still a powerful tool, but does impose limitations on the types of responses that you can gather. Your audience also has to have a handset to participate which means handing them out in your session (and gathering them back in) or in having a scheme whereby students are given a handset for a prolonged period of time.
Now that many people have internet-enabled devices such as laptops, tablets and phones, there are a growing number of apps and software products which are designed to take advantage of an internet connected audience. Why not harness the power of the devices that they already have?
At our recent E-Learning Winter Fayre, I took the opportunity to demonstrate a tool which attempts to do just that, Nearpod.
This article covers:
What is it?
Put simply, Nearpod allows you to beam a presentation onto your audience’s devices. As you move through the slides in your presentation, the slides on their devices change at the same time. Perhaps more importantly, it also lets you design interactive activities which allow your audience to communicate back to you through quizzes, polls and drawing activities.
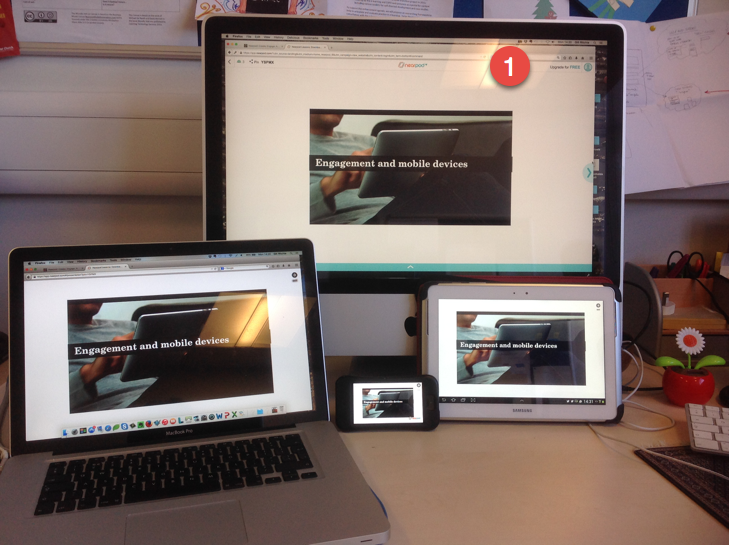
The image above demonstrates what this looks like. The computer labelled 1, is where the Nearpod session is being controlled from through a standard web browser. All the other devices are signed in with a unique session identifier. On the phone and the tablet, this is done through a Nearpod app and on the laptop, it is done through a web browser. Once people are connected to the session via their device, what they see on it is controlled by the person on the presentation computer. Changing the slides on this computer will cause the slide to change on all the other devices.
Note that there is no projector here. In fact, with Nearpod, there is no need for a projector as the audience can see the presentation on their devices. You can, however, still project the presentation simply by running the session from a computer attached to a projector.
How does it work?
- You create your presentation on the Nearpod website, combining static slide content and activity slides
- When ready, you publish your presentation
- You start your presentation by entering “Live Session” mode at which point a session identifier is generated which you can give to your audience
- Your audience join your session by launching the Nearpod app or going to the Nearpod website and entering the session identifier
- You monitor how many people have joined your session, once you have enough, you can start your presentation. Any latecomers will join the session at the current slide, they do not need to catch up.
- As you change slides in your presentation, the slides on the audience’s devices will change at the same time.
- When you come to an interactive activity slide, control is handed to the audience. They complete the activity, e.g. answering a multiple choice question or drawing a picture and then send the results to you.
- You monitor the responses can then share any of the results back with the audience, creating points for discussion.
- You then continue with your presentation or another activity
Creating your presentation
You create your Nearpod presentation on the Nearpod website. This has to be done via a web browser, it cannot be done through the Nearpod app although you can run a session from the app. You can either create the presentation from scratch using the online editing tools or you can upload a Powerpoint presentation or PDF to get you started.
Nearpod presentations are far simpler than those that can be created with Powerpoint. For content slides you can use:
- Text and images
- Embedded video
- Links to websites
Features such as slide transitions and animations are not supported in Nearpod. If you upload a Powerpoint file with these in it, they will be discarded.
You then add your activity slides. The following activity types are available:
- Poll – one multiple choice question with no correct answer
- Quiz – one or more multiple choice questions with correct answers
- Open ended question – allowing for a free text response
- Draw it – the audience have to provide their response in the form of a drawing
There are also “Fill in the blank” and “Matching pair” activity types however these were only available on trial at the time of writing and I did not try them out.
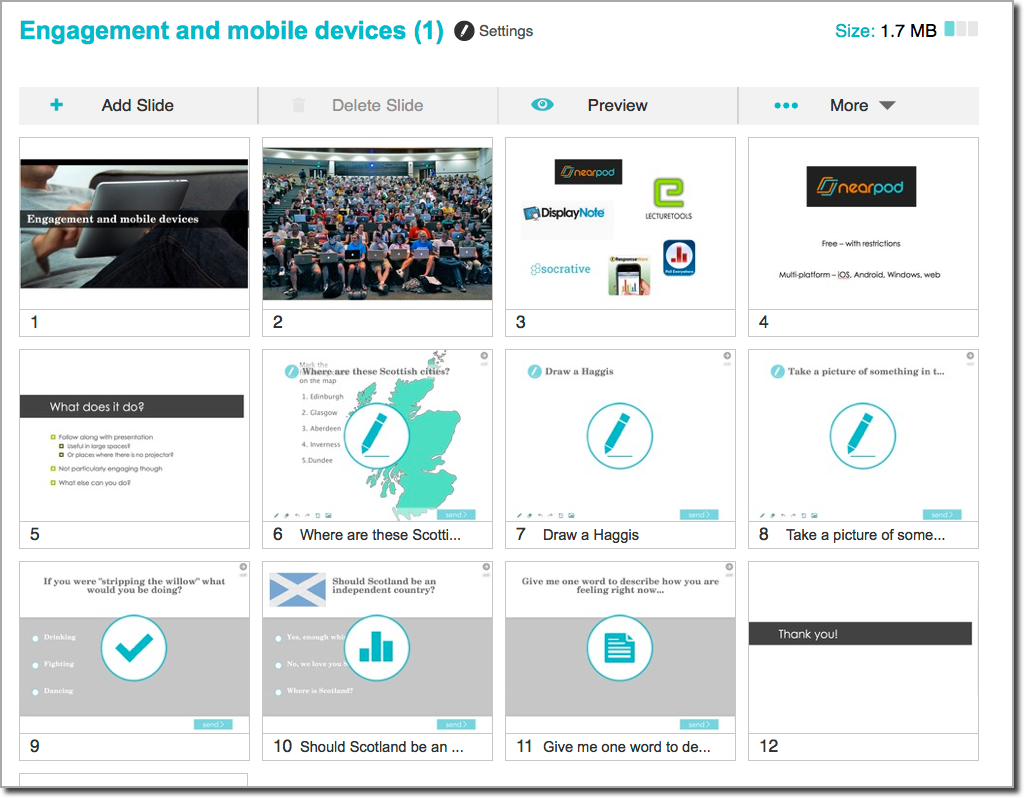
Above is a screenshot of my Nearpod demonstration presentation in the Nearpod editor.
Slides 1, 2,3, 4, 5 and 12 are static content.
Slides 6, 7 and 8 are drawing activities
Slide 9 is a quiz
Slide 10 is a poll
Slide 11 is an open ended question
Running a session

In my demonstration, I presented from a laptop connected to a large screen monitor. People gathered around and used tablets and phones to connect to the session via the Nearpod app. We were all connected to the internet via wifi.
My first few slides were static content, explaining a little of what Nearpod is and what it can do. I talked through these slides and the participants followed along on their devices.
I then reached the first of my activity slides which was a drawing activity. The following diagram explains how the activity worked by showing the different views seen by the presenter and the participants.
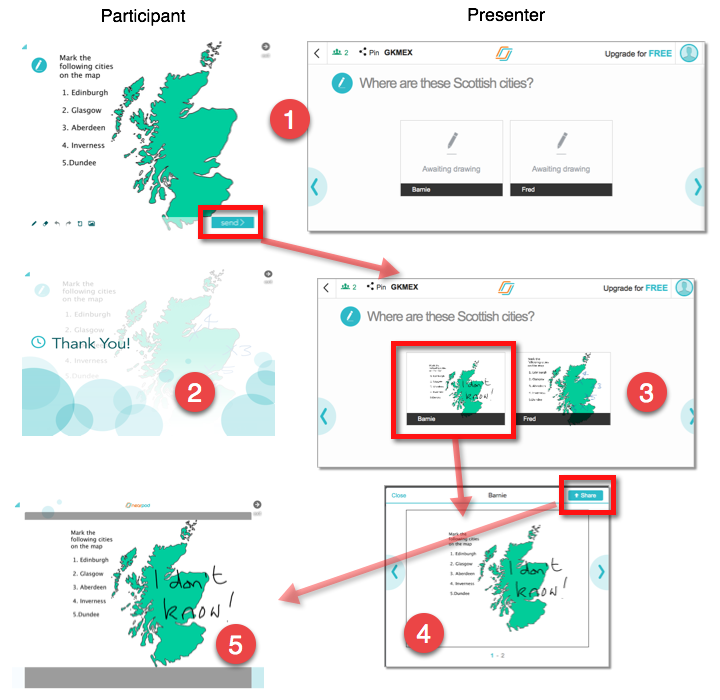
- Participants see the activity on their device, presenters see a screen showing them how many responses they are waiting for. In this case, I asked the participants to mark the locations of the major Scottish cities on a map. The participant draws their response on their device using a small number of drawing tools. They then click Send to send their response to the presenter.
- After sending their response, the participants see a “Thankyou” screen.
- As responses are sent in, the presenter can see them coming up in their display. If the presenter is not using a projector, the participants will not be able to see any responses at this stage. However, as I was projecting the presenter view onto the screen, the participants could see the responses as they came in.
- Clicking on a response will bring up it up in more detail. The presenter can then share that response with the whole audience by clicking on the Share button.
- The selected response is pushed out to all participant devices. The presenter can then have a discussion about that response.
I was shocked at how many people in the room didn’t know their Scottish cities.
Any image can be used for an activity. In this case, I uploaded an image of a map for the participants to draw on but you could use any image, an x-ray, a crossword puzzle to complete, participants can even take a picture with their device and send that in as their response.
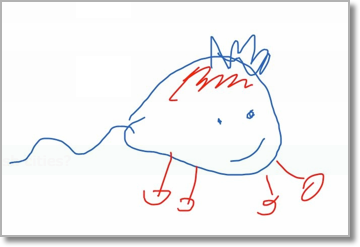 My second example was a Haggis drawing competition. In this case, participants were given a blank page to draw on. Again, this is a trivial example but it is easy to think of something more pedagogically sound. How about getting the audience to solve an equation, draw a chemical structure, draw a supply and demand curve or simply jot down some words?
There were some interesting representations of haggis.
Quiz and poll activities work in a similar way.
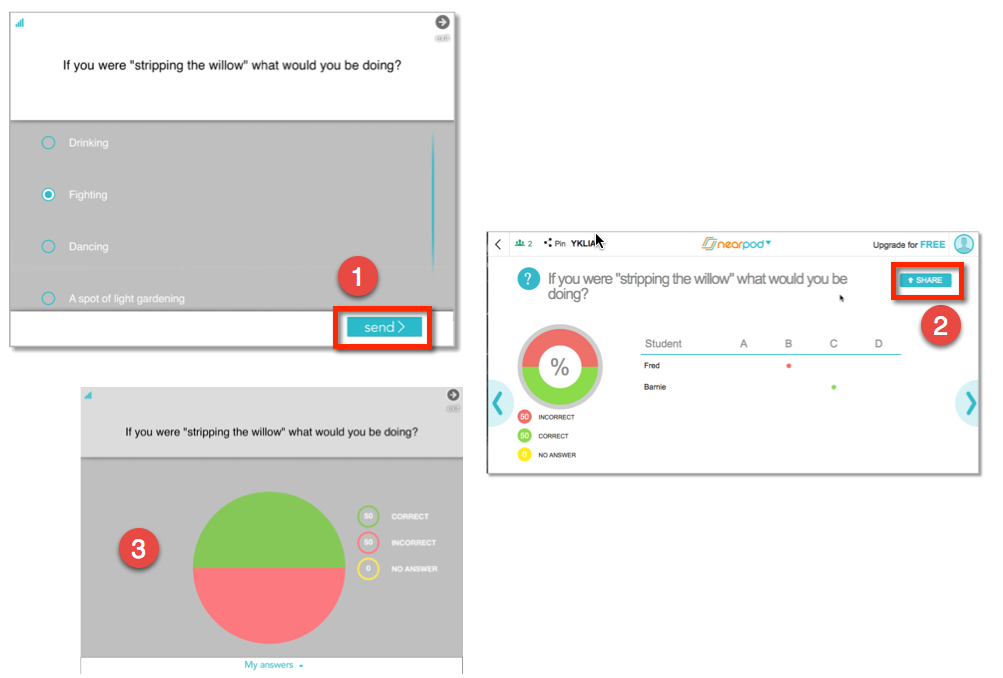
- This is what a quiz looks like on a participant’s device. They select their answer and then click the Send button
- This is the presenter’s view of the activity. As the audience send in their responses, they appear in the table. Once the presenter decides that they have enough responses, they can push the results of the quiz to the participant’s devices by clicking the Share button.
- This shows what the results look like on a participant’s device. They can see how many people got the right answer. If they can’t remember what they answered themselves, they can click on the My Answers section at the bottom of the screen to remind themselves.
Observations
For me, the power of Nearpod lies in its interactive features, particularly in the drawing tools. The product feels like it has really been designed with tablets in mind. The small screens on phones were not necessarily the best way to participate.
The polling functionality is, at the time of writing, quite impoverished when compared to other products. There are limited question types and more importantly limited ways in which the responses can be displayed. I found the open ended question type to be particularly poor in this respect and I think there are other products which may do this better. Polleverywhere, for instance, allows open ended questions to be displayed as a text wall. Other products allow the generation of word clouds to help visualise responses.
During my demonstration at the E-Learning Winter Fayre, it became apparent that I should have done the demo without projecting my presenter’s view on to a screen. There were times when I didn’t want the audience to see what I was seeing. The E-Learning Unit once found themselves on an away day, armed with all kinds of portable devices in a room with wifi but with no functioning projector. Using Nearpod would have helped in this situation. Looking back, I wonder if a better workflow with Nearpod would be to use a computer and projector for the standard presentation part of a session and use a tablet with Nearpod just for the interactive activities.
Nearpod relies on wifi to work. Both the presenter and the audience have to have internet connections. There may be issues with attempting to use a technology such as Nearpod with large audiences as our wifi access points may not be able to support a large number of devices connected at once.
Anyone who doesn’t have an internet enabled device will not be able to take part in the session. A work around to this would be if the audience could work in groups with several people using one device. This is what I did with my demonstration, I had a number of devices that people could make use of and people worked in pairs.
Since everything is going via the internet, there can be some latency. The slides on the audiences’ devices do not change at exactly the same time as the presenter’s. You have to be aware of this as a presenter and ensure that you do not move too fast.
Your presentation has to be created on the Nearpod website. This means you need to be online to create it. It is possible to upload a Powerpoint file or a PDF to create the static slide content but other content editing must be done online. I found that I could quickly create my slides in Powerpoint and then upload them to Nearpod. The Powerpoint should be kept as simple as possible.
The ability to broadcast your slides onto your audiences’ devices is interesting but also reasonably limited. This is not a tool that allows you to “screencast” to the audience. This simplicity may be the very reason that Nearpod works so well. In trying out another tool, DisplayNote, which does allow for screencasting, I have found that there are lots of problems with responsiveness.
Although Nearpod can be used through a browser on laptops, the app has to be downloaded on mobile devices. This makes using Nearpod in an “impromtu” way, as I attempted to at the E-learning Winter Fayre, slightly difficult. Participants had to download the app there and then. If you plan to make use of Nearpod, it would be best to ensure that people download it before your session.
Other features
There are a number of other potentially useful features of Nearpod which I did not investigate in my demonstration:
- Reporting – the results of a Nearpod session are stored and can be referred to after the session. They can also be downloaded. When using a paid pan, they can be downloaded as a CSV file but the free version only allows for PDF format
- Homework mode – this feature is only available in paid versions of the product but allows students to work through a Nearpod presentation in their own time. The presentation can be embedded into a web site (or a QMplus course area)
Find out more
You can find out more information about Nearpod and sign up for a free account at http://www.nearpod.com/. With a free account you can have up to 30 devices in your session. For more than this, you’ll have to move to a paid plan. Your participants do not need to have Nearpod accounts. Be aware that it is currently unclear whether the QMUL wireless network will be able to cope with large numbers of connections.
Contact the E-Learning Unit if you would like help with trying it out.
If you are already using Nearpod, or anything like it, we would love to hear how you are getting on with it.
Photo Credits
Clickers by Universidad de Navarra on Flickr
Icons from www.flaticon.com
